Selenium&PythonでGoogle Analyticsを操作する
Analytics APIでGoogle Anayticsは使えたので、Seleniumでもやってみた。
Selenium Client & WebDriver の設定
なにはともあれ環境を作る。
http://docs.seleniumhq.org/download/からダウンロードする。
pip install selenium
Seleniumのテストケースを作る。
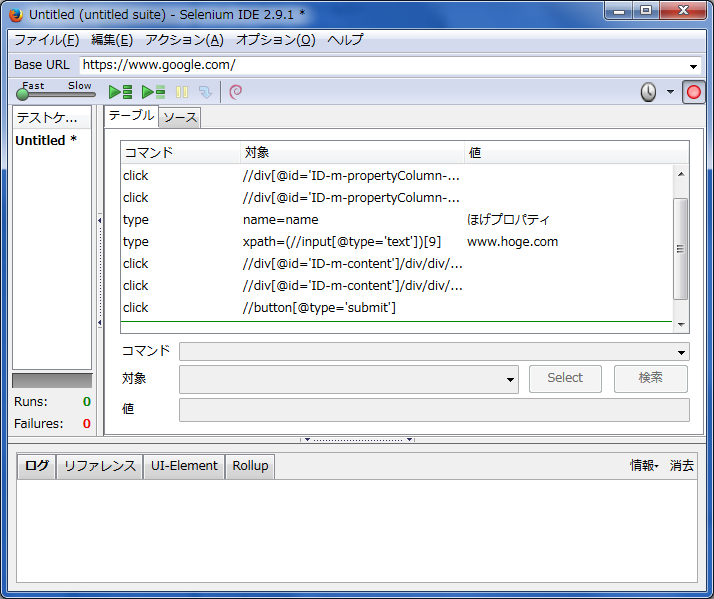
Google Analyticsの画面を開いて、Seleniumを起動。
試しに新しいプロパティを作成してみる。

上記のような感じで操作が記録される。
記録を止めて、「ファイル>テストケースを保存」すると、テストケースがhtmlファイルに出力される。
pythonアプリを作ってみる
このテストケースからSeleniumで自動化したい処理を記述する。
# -*- coding: utf-8 -*-
'''
Created on 2015/12/21
@author: kanpuri
'''
from selenium import webdriver
from selenium.webdriver.firefox.webdriver import FirefoxProfile
from selenium.common.exceptions import NoSuchElementException
from selenium.common.exceptions import NoAlertPresentException
path_to_my_profile = 'C:\\Users\kanpuri\\AppData\\Roaming\\Mozilla\\Firefox\\Profiles\\nhlzxg5i.ga_profile'
my_profile_name = "ga_profile"
analytics_id = 'a12345678w12345678p12345678' #GAのURLにあるアナリティクスIDを入れる
property_url = analytics_id + '/%3Fm.page%3DNewProperty/' #新規Webプロパティの作成
ga_url_class_id = "(//input[@type='text'])[9]"
ga_indutry_btn_id = "//div[@id='ID-m-content']/div/div/div/div/div/div[2]/div/ui-view/form/section[4]/section[2]/div[2]/ga-industry-selector/ga-select-dropdown/ga-dropdown/button"
ga_indutry_menu_id = "//div[@id='ID-m-content']/div/div/div/div/div/div[2]/div/ui-view/form/section[4]/section[2]/div[2]/ga-industry-selector/ga-select-dropdown/ga-dropdown/div/ga-select-menu/div/ul/li[9]/div"
ga_time_zone_btn_path = "//div[@id='ID-m-content']/div/div/div/div/div/div[2]/div/ui-view/form/section[4]/section[3]/div[2]/ga-time-zone-picker/div/ga-select-dropdown/ga-dropdown/button"
ga_time_zone_menu_path = "//div[@id='ID-m-content']/div/div/div/div/div/div[2]/div/ui-view/form/section[4]/section[3]/div[2]/ga-time-zone-picker/div/ga-select-dropdown/ga-dropdown/div/ga-select-menu/div/ul/li[176]/div"
profile = FirefoxProfile(path_to_my_profile)
driver = webdriver.Firefox(firefox_profile=profile)
driver.implicitly_wait(60)
ga_url = "https://www.google.com/" + "analytics/web/#management/Settings/" + property_url
driver.get(ga_url)
driver.find_element_by_name("name").clear()
driver.find_element_by_name("name").send_keys("property1")
driver.find_element_by_xpath(ga_url_class_id).clear()
driver.find_element_by_xpath(ga_url_class_id).send_keys("www.hoge.com")
driver.find_element_by_xpath(ga_indutry_btn_id).click()
driver.find_element_by_xpath(ga_indutry_menu_id).click()
driver.find_element_by_xpath(ga_time_zone_btn_path).click()
driver.find_element_by_xpath(ga_time_zone_menu_path).click()
driver.find_element_by_xpath("//button[@type='submit']").click()
こんな感じ。ちなみにFireFoxのプロファイルを読み込んでAnalyticの画面にログインしないで開けるようにしている。
profile = FirefoxProfile(path_to_my_profile)
driver = webdriver.Firefox(firefox_profile=profile)
これをやらないと毎度GA(Google Analytics)にログインしないといけないので面倒である。
ちなみにFireFoxのプロファイルの作り方はWindowsのコマンドプロンプトを起動して
firefox.exe -P
として新しいプロファイルを作り、予めGAにログインしておきCookieを保持しておけばよい。
プロファイルは
C:\Users\kanpuri\AppData\Roaming\Mozilla\Firefox\Profiles\nhlzxg5i.ga_profile
のように保存される。これを読み込んでSeleniumを起動しているってわけ。
もろもろのSeleniumのAPIは本家のドキュメントを嫁ってことで以上です。
Selenium WebDriver — Selenium Documentation
#しかし、GAの画面のオブジェクトにnameがついてないので、ソースは非常に汚いですな。